This example is a guideline on how to write a Matlab script that, together with the Middleware, communicates with a vehicle. This tutorial is based on our platoon example (which is just a series of vehicles following a preset path without much logic behind that behavior), which you can find in
More specifically, we well take a look at main_vehicle_ids.m.
As you can see in the following sections, this script uses another script, called init_script.m.
Init script
The init script is similar (in its idea) to the cpm library for your C++ programs: It is supposed to take care of redundant work for you. In this case, it sets up all relevant DDS participants for the communication within the network. It also loads the required IDL files, loads XML files for QoS settings and sets the variable for the stop signal, which will be mentioned later on. It currently requires a given folder structure, which is automatically set up on the NUCs and should also be part of the software repository's structure - in an ideal case, you do not need to worry about that, as long as you import the init script from its original place (TODO: although other rules may apply for deploying remotely).
You can find it here:
Working with RTI DDS in Matlab
Please consult RTI DDS and Matlab to get an idea of how to work with DDS in Matlab. The Middleware-specific IDL file is only relevant for the communication between Middleware and Matlab script and is thus not part of the cpm library.
Your Matlab script is not supposed to directly communicate with the vehicle or to perform timing operations with the LCC. This is the Middleware's task, so your task is just to properly communicate with the Middleware (if you only want to control the vehicle).
The Middleware will wake your script up regularly to perform a computation with the currently given values, and you just need to respond in a proper way. This allows you to focus on problem solving instead of timing and communication.
Setup
The structure of your code
Your function head may differ, but you must use varargin as your last parameter to pass vehicle IDs to your script. This allows you to define, for your script, which vehicle(s) it should be responsible for. Any previous parameters you define are your own 'custom' parameters and need to be specified as additional parameters in the Lab Control Centers' UI before starting your script (if you wish to start it using the UI).
function main(varargin)
...
vehicle_ids = varargin;
In other words: If your function head looks like this
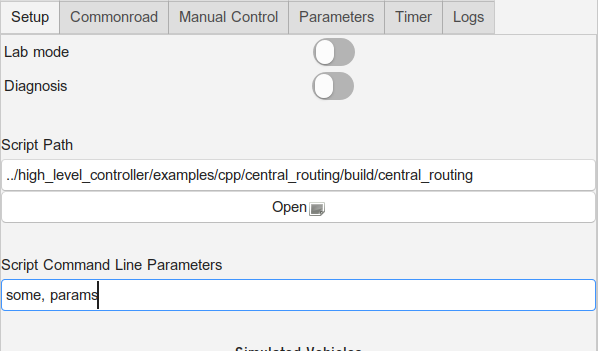
function main(some, params, varargin)
then you need to pass some, params as additional parameters in the LCC's UI (ignore the script path in the screenshot):
What your HLC scripts need to include
Import the init script
Set the Matlab domain ID to 1, go to the right directory for the init script, load the script, store the vehicle IDs. In the case the reader reads all vehicle states sent within the network aggregated by the Middleware, a waitset is set to wait upon taking data from the reader if no data is yet available. The timeout is set to 10 seconds.
Tell the Middleware that your script is ready to operate
You must send a ReadySignal message after initialization - only the ID string matters, which must be of the form "hlc_" + vehicle_id, where the latter is the ID of the vehicle the HLC and thus your script is responsible for:
You use the ReadyStatus type here, which was defined in one of the IDL files that was imported for you using the init script. You can see the values of this type in the IDL file:
https://github.com/embedded-software-laboratory/cpm_lab/blob/master/cpm_lib/dds_idl/ReadyStatus.idl
This message tells the Middleware that your script is now ready to operate and to receive its data. Thus, at this point, your reader for vehicle states (here stateReader) should be initialized so that it can receive the data.
Consider the timing signals
This is very important. There are two signals you must consider: Start and stop signals. You have to check regularly for the stop signal, and once for the start signal:
- Start signal: This indicates that your script is supposed to calculate a new e.g. trajectory for the vehicles it is responsible for. Start with calculation immediately and send the results back as soon as possible. The Middleware handles the rest.
- Stop signal:
trigger_stop = uint64(18446744073709551615)was already set by the init script. It is the highest number representable with a uint64_t type. This number indicates that the simulation was stopped, and thus your script should immediately terminate. - All other numbers are irrelevant. From here on, new messages received by the reader of
VehicleStateList,stateReader, are interpreted as start signals for less redundancy.
Waiting for the initial start signal may look like this:
You need to repeat this procedure to check for the stop signal every time before you wait for the next start indicator sent by the Middleware (which is indicated by new samples in VehicleStateList). The loop, that includes calculating new data as well, may look like this:
Receive information about your vehicle
Information about your vehicle are contained in the VehicleStateList messages, which include the current states and observations of all vehicle as well as the current time. This signal is supposed to be the start signal for the HLC, so computation should start using this data directly after the message was received.
These signals, which, in this example, you can obtain using the stateReader, contain two fields which are vital to the correct usage of your script.
- The messages contain current information about the whereabouts and settings of your vehicle as well as any other vehicle in the simulation. Use this data for planning.
- The messages contain timing information. Use these when you send commands to your vehicle - they contain the current time you set for the messages.
This signal has a third purpose as well. It shows the script when to start the computation, similar to a timing signal. The desired computation cycle is the following:
- Wait for a new message
- After receiving a message, start your computation
- Then send the new command(s) to the vehicle
- Remove messages that were received during computation, as they are old and potentially unusable, and wait for the next message
- ...
Make sure to ignore signals received during computation, if that takes longer than a single period.
Send commands to your vehicle
You need to send vehicle command messages as a result of your computation including the vehicle ID to the Middleware, which propagates these to the vehicle. The implementation of the computation of e.g. the vehicle's trajectory is not explained here and depends on your task. You are only given an example of how to send a simple trajectory here.
In the script which we were looking at until now, we use another script within the same folder (only that is allowed if you want to use several scripts) to compute the next trajectory segment:
In the following, you see an example of how to set up a trajectory message, that can then be sent using the trajectoryWriter:
Bash script
If you want to start your script using a bash script, you can do it like this:
/opt/MATLAB/R2019a/bin/matlab -logfile matlab.log -sd $script_dir -batch "$script_name(1, ${vehicle_id})"Usually, you would want to start it using the LCC instead, which takes care of these things for you.
Overview
Content Tools