Page History
In this first example we show you how to write your code in C++ how to geht your code to work in the Lab Control Center. Using this example code your vehicles will drive in a circle (not attached to the map). The code also includes a possible solution to drive a figure eight (see code comments).
...
General procedure to run let your vehicles drive
Here is basically what you always do, if you want one or more vehicles drive according to your trajectory:
- Write your code in C++ or Matlab
- Compile it, if you use C++
- Upload it to the Lab Control Center (LCC) (see here)
- Press "deploy"
Code description
You define the position of the target points, the speed of your vehicle for each section and the time the vehicle needs to pass a segment. In this example the target points are not connected to the map.
This vector defines the x position of a target point (m):
vector<double> trajectory_px = vector<double>{ 1, 0, -1, 0}This vector defines the y position of a target point (m):
vector<double> trajectory_py = vector<double>{ 0, 1, 0, -1}This vector defines the x speed to the target point. The sign gives the orientation in the cartesian coordinate system (unit (m/s)):
vector<double> trajectory_vx = vector<double>{ 0, -1, 0, 1}This vector defines the y speed to the target point. The sign gives the orientation in the cartesian coordinate system (unit (m/s)):
vector<double> trajectory_vy = vector<double>{ 1, 0, -1, 0}This vector defines the time the vehicle takes between two target points (unit ns):
vector<uint64_t> segment_duration = vector<uint64_t>{1550000000ull, 1550000000ull, 1550000000ull, 1550000000ull}In this vector we see the time for 1 m/s and a way length of pi/2 (a quater circle ;))
Advice for use:
...
- in the LCC
If you only want to drive a vehicle to a specific point follow the instructions here.
Code example
C++
Circular trajectory generation for one vehicle
MATLAB
Circular trajectory generation for one vehicle
How the code works
In this first example we show you how to write your code in C++ or MATLAB. In this example one vehicle drives in a circle which is not attached to the map.
Initialisation
Therefore you first initiate a Writer for the RTI DDS Service to ensure the position and speed will be sent to the simulation and the vehicle.
Giving direction and speed
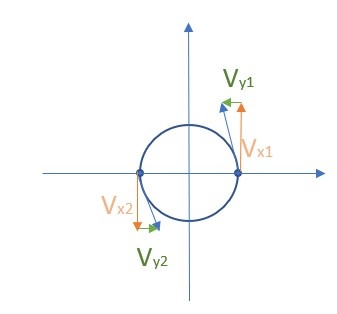
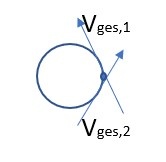
In the next step you define the points and the speed of your vehicle at each point for your entire trajectory. When you use v_x and v_y keep in mind that this is not the actual speed but the speed vector at your current location (remember that vges = sqrt(vx^2 +vy^2) as it is a
...
...
vector). You use this vector to define the direction for your vehicle, so where it has to steer next:
 |  |
|---|
When you define the speed vector also be aware that the tangent will fit with the vector/tangent from the previous point
...
and that the shape of the curve is not only affected by the vector of the starting point but also of the vector at the end point/next starting point
...
. It turns out that it is the easiest way to define your speed vector by drawing our shape first and define the signs of your vectors to ensure the right orientations. It
...
is recommanded to always define a speed for both v_x and v_y, even if it is a small value, to ensure the right
...
orientation of your vehicle. Last but not least remember that your are giving a trajectory to a physical system so sharp edges won't be possible
...
C++
Circular trajectory generation for one vehicle
MATLAB
Circular trajectory generation for one vehicle.
Segment duration
For the segment duration keep in mind that speed, time and waylength have to fit. Verify your speed/way/duration with vges =s/t.
Sending the trajectory information to the vehicle
At last you sent all data to your vehicle using the writer-function from the beginning.
Overview
Content Tools